Section 1
Introduction
Section 2
The Maestro Interface
Section 3
Defining a Job
Section 4
Defining Recipients
4.2 Source Reaction to Previous Job
Section 5
Defining Content
Section 6
Defining Tracking
Section 7
Sender and Delivery Options
Section 8
Outbox
Section 9
Delivered Jobs
Section 10
Reporting and Statistics
Section 11
User Settings
Appendix A
24 Hour Clock
Appendix B
International Character Sets
Appendix C
Comma Separated Files
Appendix D
AOL Rich Text
Section 4 Defining Recipients of an E-mail Job
The next step in creating an e-mail job is to define or select the recipients of the message. Recipients can be selected from a past job or a new recipient definition can be created. LISTSERV® Maestro also gives the user the option of eliminating duplicate recipients based on e-mail address or other unique column identifiers.
Generating a new recipient definition is a multi-step process. The recipients definition wizard is composed of the following steps that will guide the user through the process:
- Options Deciding where the recipient data will come from.
- Source - Selecting the source information and/or uploading a source file from which the recipient data will be generated.
- Source Details Interpreting the recipient data file into labeled columns such as name and e-mail address.
- Recipient Details Adding or editing header information (labels for columns).
- Summary Displaying the interpretation of the recipient data in a table for review.
Depending on the selection of options for each step, subsequent steps and options will become available.
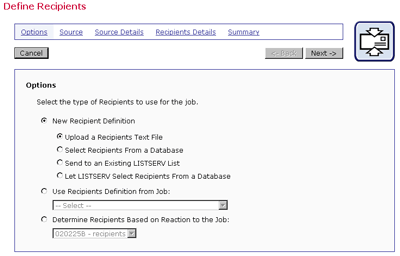
The first screen that opens in the define recipients process is the "Options" screen. There are six options that can be selected to define the source for a recipient list:
- New Recipient Definition Creates an original recipient list for the job from data generated from one of the following selections:
- "Upload a Recipients Text File" A text file uploaded into the system defines Recipients.
- "Select Recipients From a Database" Recipients are defined by a LISTSERV Maestro defined database that is connected to by a plugin installed and configured by the LISTSERV Maestro system administrator.
- "Send to an Existing LISTSERV List" - Recipients are defined by a LISTSERV list. The list is owned by the e-mail address registered for the LISTSERV Maestro account. The LISTSERV site administrator or the LISTSERV Maestro system administrator must configure this set-up.
- "Let LISTSERV Select Recipients From a Database" - Recipients are defined by a database that has been configured so that LISTSERV has direct access to it.
- Use Recipient Definition from Job Recipients are copied from
a previous job, including all the recipient details such as LISTSERV
list options and so on. Select the previous job using a pull-down menu
listing the jobs available.
- Determine Recipients Based on Reaction to the Job Recipients are selected based upon a defined action they performed in a previous job. Select the previous job from the pull-down menu. This option can only draw recipients from jobs with personal tracking, and where the recipients were defined using "Upload a Recipients Text File" or "Select Recipients From a Database."
Select either "New Recipient Definition:" and click the option button next to where the recipient list will be generated, "Use Recipient Definition from Job:" and choose a job from the pull down menu, or "Determine Recipients Based on Reaction to the Job:" and choose a job from the pull down menu. Click Next -> to continue.
The <- Back and Next -> buttons navigate to the previous and following pages, automatically saving any changes on the current page. Click on any active link to go immediately to that screen, saving any changes to the current page. Click Cancel to close the wizard without saving changes and return to the Workflow or Summary diagram page.
Caution: Do not use the browsers back button to navigate within the program because entries may not be automatically saved.
Figure 8 Define Recipients Options Screens

