Q: How Can I Let My Subscribers Decide When to Receive My Newsletter?
Answer by Ben Parker
Chief Corporate Consultant, L-Soft
Rather than trying to decide when is the most effective time to send your newsletter or other email messages, why not let your subscribers specify the time of day they would like to receive your email? Some studies1 have shown that this practice can produce a significantly higher click-through return rate. Obviously, if you are sending marketing emails this could be important, but even for a not-for-profit organization newsletter it is a value-added service to be able deliver emails when the recipient is ready to receive them. This can also be useful if you are sending emails to an international audience where recipients are in widely separated time zones.
So, can we accomplish this in LISTSERV Maestro? In short, yes. This is actually not terribly complex if you plan carefully how to do it. The process will combine several features and functions of LISTSERV Maestro: the Recipient Warehouse, a Dataset, a Hosted Recipient List, a Lookup Table, *Calc functions for the date/time arithmetic, and finally, the Auto-Repeat Delivery setting. Let's first consider what is needed to accomplish this.
Several things are immediately obvious. You need a database (or dataset) to store your recipient data because in addition to the obvious data like email address and name, you need a field to store each subscriber's delivery time preference. Existing, standard LISTSERV lists do not and uploaded text files generally will not have the necessary extra data field. Data pulled from an external database or data stored in LISTSERV Maestro's Recipient Warehouse (Hosted Recipient Lists) can have the necessary field added to an existing data table, or the field can be designed in the beginning.
Next, it is necessary to divide the day into discrete time segments and then allow subscribers to choose the segment that matches their delivery time preference. At worst, these would be 1 hour intervals. However, this presents each user with choosing one out of 24 segments. Human nature makes it difficult to select one from among so many choices. You could instead devise 12 two-hour segments or 8 three-hour segments, 4 six-hour segments or even 2 twelve-hour segments. It is important for the Auto-Repeat function that all segments be of equal length. For this example we will use 6 four-hour segments. Start your counting from midnight. So we will have 00:00 - 04:00, 04:00 - 08:00, 08:00 - 12:00, 12:00 - 16:00, etc.
When inputting data into the 'Preferred Delivery Time' field, it is important that the data be entered in an exact, predictable manner as the date arithmetic functions will rely on correctly parsing the low and high end limits of the segment time range. For this reason, a Lookup Table will be used to ensure uniformity of data format. Also this automatically displays to the subscriber as a drop-down selection list, which makes data input easier and faster, as well as more accurate than free-form input.
In greater detail here are the steps involved. For this example I had no pre-existing data so I went into the Recipient Warehouse and created a new Dataset. See the Data Administrator Manual2, Sect 4.1 for detailed instructions if you are not familiar with this process. See Sect 4.1.2 if you have an existing dataset that you want to modify and add a new field for 'Preferred Delivery Time'.
These are the Profile Fields that I created in the Dataset for this example:
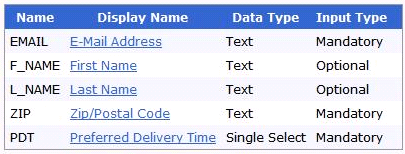
Note that the PDT field is required input. This means that subscribers must make a choice from the dropdown menu. They cannot leave it blank so that we can be certain every subscriber will have a properly formatted data value in this field. There can be no subscribers with an empty field as they would never receive any emails. Also, since it is a Single Select field, they can make only one choice.
I also created the Lookup Table (Sect 4.2 of the Data Admin Manual2) and populated it with appropriate values:
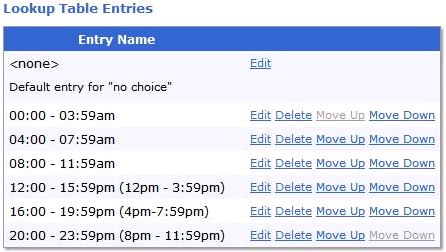
The choices are in chronological order, using the 24-hour notation. Note the careful format and spacing of all the times, like "00:00 - 03:59". The HH are always 2 digits and all other spacing is exactly the same up to the am/pm point. After that, I added explanatory text for the PM times since not all people are familiar with 24-hour time. Note further that I ended the segment range at one minute less than the start of the next range. This ensures that there is never any overlap of times in the segments.
From the Dataset I created a Hosted Recipient List (HRL) (Sect 6 of the Manual2) and populated it with subscribers (Sect 9 of the Manual2), ensuring that I had at least one subscriber in each of the six time segments.
Then I copied and edited the default Target Group created by the system for this HRL (Sect 14 of the Manual2). I needed to modify the Target Group to insert the necessary formulas for calculating the correct time range to select for each time segment. The Calculation functions are detailed in Sect 18 of the LISTSERV Maestro User's Manual3.
Basically what we need is a formula (or pair of formulas) that will take the current time when the job is mailing out and convert that into a time segment so the proper recipients for that segment will be selected and mailed to. Since we intentionally stored the 'Preferred Delivery Time' (PDT) as a range with a low end and a high end, we need to perform two calculations:
'now' greater than or equal to 'low end' of range and
'now' less than or equal to 'high end' of range
Remember, we also designed the ranges so that there would be no overlap. That is, the range is 04:00 - 07:59 instead of 04:00 - 08:00. If we chose the latter, then since the next range is 08:00 - 12:00 we would have two different time segments where the value '08' exists. By making our high end at one minute less than the start of the next range we avoid this problem. All values in each range are unique to that range.
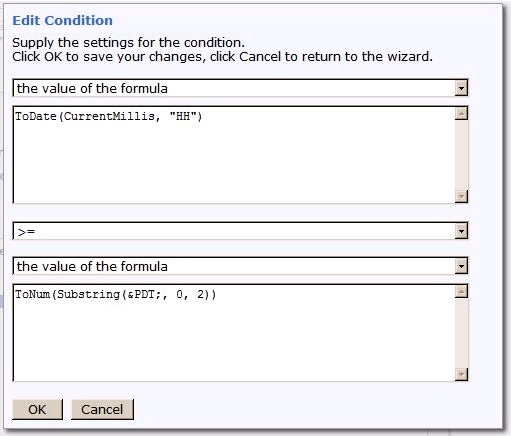
Since our time range (PDT) was stored as a very exactly formatted string, we can use the 'Substring' function to extract the numbers of the low end (start at position '0', end at position '2) and high end (start at position '8', end at position '10') of the PDT string:
Substring(&PDT;, 0, 2) and Substring(&PDT;, 8, 10)
The current date/time is returned by the 'CurrentMillis' function. Since we only want the current hour (in the 24-hour cycle), we use the 'ToDate' function with the "HH" mask to return only the hour:
ToDate(CurrentMillis, "HH")
Note carefully that the result value is of type 'number', not string. This is important because we cannot compare a 'number' to a 'text string' value. It must be 'number to number' or 'string to string'. This is why we use the 'ToNum' function to convert the Substring values to a number we can then compare to the current time:
ToNum(Substring(&PDT;, 0, 2))
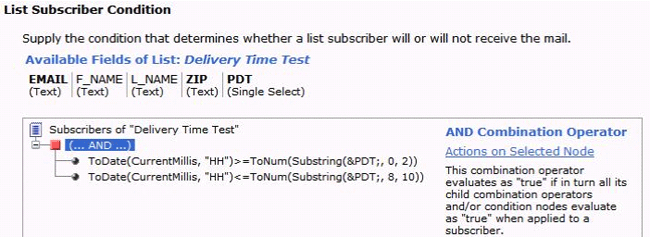
Putting all this together with the greater/less/equals operators, here are our two functions:
(ToDate(CurrentMillis, "HH"))>=(ToNum(Substring(&PDT;, 0, 2))
(ToDate(CurrentMillis, "HH"))<=(ToNum(Substring(&PDT;, 8, 10))
Because we need both of these formulas to be evaluated, when editing the Target Group we must add both formulas as conditions:
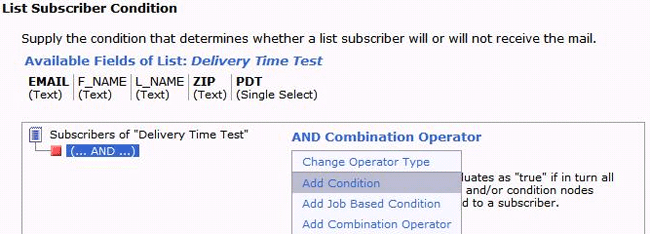
Then we can add the actual formulas using the 'Add Condition' selection. This is how the formulas themselves are entered:
Finally we have both formulas entered and complete. This is a good time to double-check for any typographical errors:
Editing this Target Group was a long process, but you can re-use this Target Group many, many times over for future jobs without further modification or changes, so the time was well spent. Now you proceed through the normal LISTSERV Maestro 'Workflow' process, define the recipients using your now completed Target Group, enter the message content, define the sender, define tracking (if any), and perform a delivery test. Before you can Authorize Delivery we need to set the Delivery Settings. (Sect 8.2 in the User's Manual3.) When you enter this page, click on the 'Advanced Scheduling Options'.
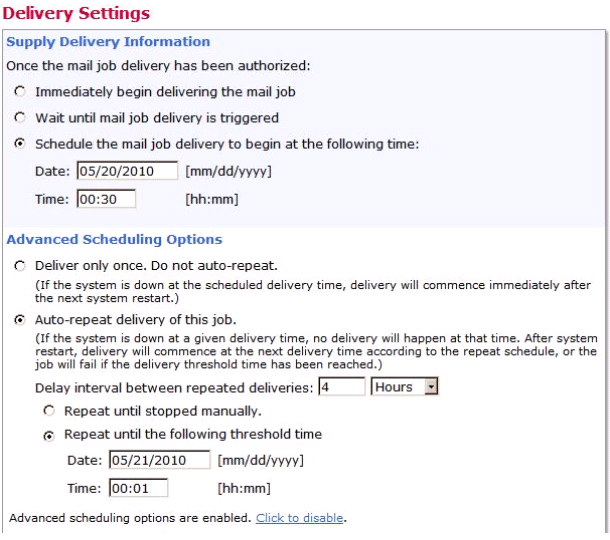
Select the future date/time that you want the first mailing of the 24-hour cycle to begin. I have chosen to start the mailing after midnight on the desired date. I have also chosen the release time of 30 minutes after midnight. Do not choose to start exactly on the :00 start of the segment.
Next, choose the Auto-Repeat delivery option. I set the delay interval to the length of our time segments (4 hours) and select the 'repeat until' threshold date/time. Note the date is exactly 1 day later than the start date and the expiration time is just barely into the time segment interval but before the actual delivery release time set above. The reason for this (and the reason for setting the release time some time into the segment) is so that the threshold will expire before the next delivery time. This ensures that exactly and only 6 jobs are sent, one for each time segment, covering all the 24-hour cycle but no more, so there are no accidental repeats.
What happens with Auto-Repeat delivery is that the initial job in the series goes at the set date/time. As soon as this job is sent, LISTSERV Maestro immediately sets up another job with exactly the same contents and recipient definition for exactly 4 hours later. However, due to the date/time arithmetic in the Target Group, the message will be sent to a different group of recipients each time the job mails out. The cycle ends after 24 hours.
Unlike the Target Group where we can set it once and reuse indefinitely, these delivery time settings must be done for the initial job of each mailing cycle. But you can make this easy if you remember when creating a new job for the next mailing cycle to choose the 'Copy settings from previous job'. That will set the same Target Group for Recipients, the same sender and most of the same delivery settings. You will only need to change the start/end dates. Of course you will also need to enter new message content and define new tracking links but the 'copy previous job settings' feature will save you a lot of time.
Soon you will be easily doing all of your mailings this way, with a nice added-value benefit to your subscribers and an increased interest from them in your mailings.
References
1. "The Best Time and Day to Send to Your List"
http://www.silverpop.com/blogs/email-marketing/best-practices/the-best-time-a.html
2. LISTSERV Maestro Data Administrators Manual
http://www.lsoft.com/manuals/maestro/4.0/LISTSERVMaestro4.0_DataAdminManual.pdf
3. LISTSERV Maestro Users Manual
http://www.lsoft.com/manuals/maestro/4.0/LISTSERVMaestro4.0_UsersManual.pdf
Subscribe to LISTSERV at Work (American Edition).
| 
