|
Tech Tip (LISTSERV Maestro) – Issue 3 – 2008
Q: I have several jobs that I would like to compare without having to run a separate report for each job. Is there an easier way to do this?
Answer by Holly Taylor
Technical Writer, L-Soft
LISTSERV Maestro's Job Comparison reports allow you to dynamically compare the tracking events for two or more jobs (up to 12 jobs can be included). Job Comparison reports enable you to compare separate standard jobs or to compare the variants of an A/B-Split Job, helping you figure out the best variant for the job.
To compare two or more standard jobs, go to the Completed Jobs screen, click on Mail Job, select Multiple Job Action, and then select Enable Multiple Job Actions. Select the jobs that you want to compare, and then select Mail Job > Multiple Job Action > Job Comparison Report. The Job Comparison Report Setting screen opens.
To compare the variants of an A/B-Split Job, go to the Completed Jobs screen and select the A/B-Split Job (not one of its variants) that you want to work with. The A/B-Split Job Details screen opens. From here, select Mail Job > Comparison Report for Completed Variant Jobs. The Job Comparison Report Setting screen opens.
The Job Comparison Report Settings screen is where you define the settings for the report. Once you have finished defining the report's settings, click [OK] to run the report.
The Job Comparison Report is displayed. Initially, the report displays only the Job Reports tab, which contains the individual reports for all included jobs, as well as a blank comparison tab.
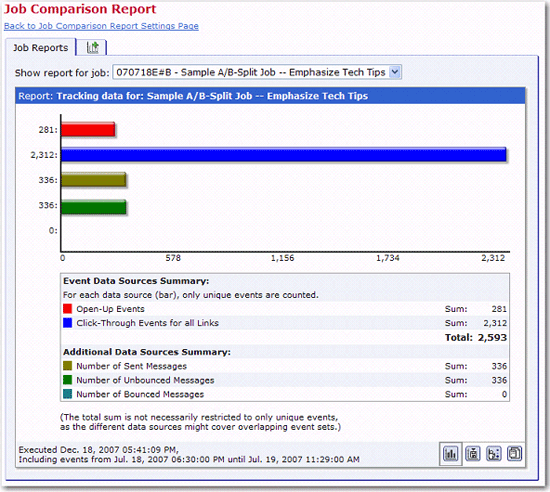
The Job Reports Tab displays the individual reports for all included jobs in the comparison report. One individual report is displayed at a time. Select the job for which you want to display the individual report from the Show Report for Job drop-down menu at the top of the tab. The displayed report is similar to the normal report that can be displayed for a completed job via the Reports tab on the job's Completed Job Details screen.
The comparison tabs are the heart of the job comparison report. There can be any number of these tabs, and each tab can be used to create an individual comparison of the data sources from several of the included jobs in the report.
When you click the Job Comparison icon, a new comparison tab will be created. This tab can be used for individually configured comparisons of the tracking events of several of the included jobs. There can be any number of such additional comparison tabs, for various comparisons.
Click the Back to Job Comparison Report Settings Page link at the top of the page to go back to the settings screen, which is where you can change the general settings for the report (for example the report type and the type of the included data sources).
When you have finished with a specific comparison tab, click the Close Tab link at the top right of the tab.
Each freshly created comparison tab is initially empty and waits for you to select the jobs and report data sources to compare. For this selection, use the Job Selection for Comparison panel that appears at the right side of the window whenever a comparison tab is the active tab.

On this panel, choose the jobs that you want to compare by selecting their corresponding checkboxes. For each selected job, you may then also select one of its data sources to be included in the comparison chart. So, for each selected job, there will always be exactly one data source that is included. Each job has an associated color that is displayed in the margin on the left side of the selection panel. This color is also used to represent the selected data source of this job in the comparison chart. Depending on the type of the report, the data source will appear either as a colored line (in a "distribution over time" chart) or as a colored bar (in a "sum of events" chart).
Note: If you are working with a small window size, then the job selection panel may overlap the actual reporting tab. In this case, to be able to view the full reporting tab without having to scroll horizontally, simply hide the job selection panel by clicking the Hide Selection Panel link at the top right of the panel. Of course, while the panel is hidden you can no longer change the selection of jobs and data sources, so to show the panel again, click the Show Selection Panel link that appears below the report on the reporting tab whenever the selection panel is hidden.
Use the Select All and Unselect All links at the top of the panel to quickly select or unselect all jobs in the list. By choosing the right combination of selected jobs, and for each job the selected data source, you can build your own individual comparison chart, which allows you to directly compare the data that interests you. And, by adding more comparison tabs, you can create several of these comparison charts. You can then quickly switch between these different charts by switching between the different comparison tabs.
For example, on one comparison tab you could compare the open-up data sources of several jobs, while on another comparison tab you could compare the click events for a certain link that appears in several jobs, or any other useful combination.
If you find a certain comparison chart especially useful, then you can use the Create Report icon at the bottom right of the comparison tab to create and save a standard tracking report that contains the selected jobs and data sources. You can then execute and view this report via the normal Tracking Reports list at any time, without having to go through the job comparison report interface again. (This option is only available if you have the necessary user rights and if at least one job is currently selected.)
| 