Section 1
Introduction
Section 2
The Maestro Interface
Section 3
Defining a Job
Section 4
Defining Recipients
Section 5
Defining Content
Section 6
Defining Tracking
Section 7
Sender and Delivery Options
Section 8
Outbox
Section 9
Delivered Jobs
Section 10
Reporting and Statistics
11.2 Creating Drop-In Content
Appendix A
24 Hour Clock
Appendix B
International Character Sets
Appendix C
Comma Separated Files
Appendix D
AOL Rich Text
11.2 Creating Drop-In Content Elements
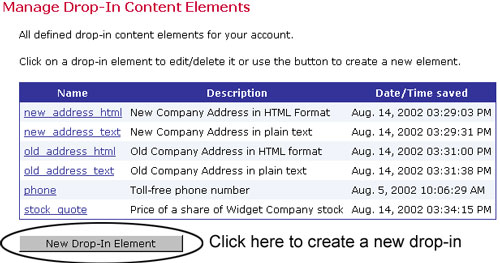
Click on Drop-In Content Elements to open the "Manage Drop-In Content Elements" screen. From here it is possible to create a new drop-in content element or edit an existing one. For more information about the nature of drop-in content, see Section 5.1 Drop-In Content or the online help. Click on the button New Drop-In Element to create a new drop-in or click on the name of an existing drop-in to edit it.
Figure 81 Manage Drop-In Content Elements
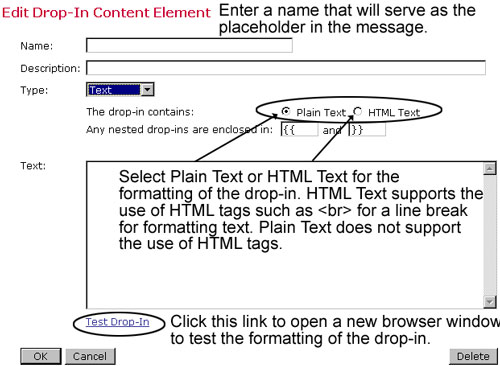
Select the type of drop-in from the pull-down menu. The "Edit Drop-In Content Element" screen will appear. This screen will appear in different formats depending on the type of drop-in selected. There are four types of drop-in content elements that can be created:
- Text – Text elements can be plain text or HTML text. Plain text elements are best suited for plain text or alternative text messages. HTML text drop-ins contain HTML tags to format the text such as <br>for a line break and <b>for bold. Plain text can be inserted into an HTML message, but formatting such as line breaks will not necessarily appear as expected. HTML text containing tags is not compatible with a plain text message because the tags will be seen in the message and will not format the text.
Figure 82 Edit Drop-In Content Element - Text
![]() Drop-in content for plain text messages should be rendered using the
Plain Text setting and drop-in content for HTML should be rendered using
the HTML Text setting. For HTML messages with alternative text, create
two separate drop-ins, one in each format, and use each in its appropriate
message part.
Drop-in content for plain text messages should be rendered using the
Plain Text setting and drop-in content for HTML should be rendered using
the HTML Text setting. For HTML messages with alternative text, create
two separate drop-ins, one in each format, and use each in its appropriate
message part.
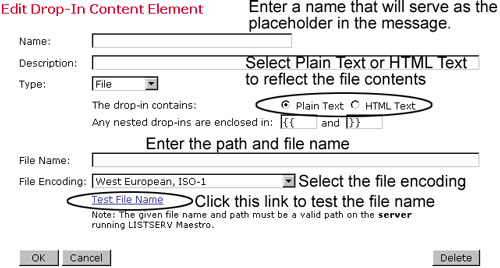
- File – The content of this type of drop-in element is loaded from a text file that is accessed by a file name defined here. The file itself must be accessible from the server and not a local file on a workstation computer. See the LISTSERV Maestro Administrators Guide, or the system administrator for more information.
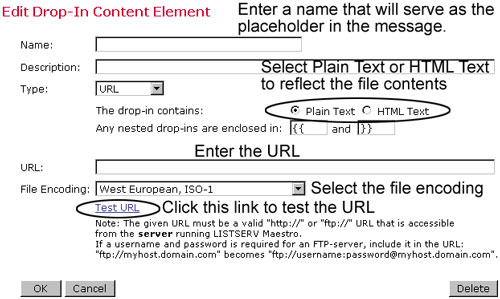
- URL – The content of this type of drop-in element is loaded from a text file accessed by an http:// or ftp:// URL defined here. The URL must be accessible form the server and have an http:// or ftp:// protocol. See the LISTSERV Maestro Administrators Guide, or the system administrator for more information.
- Database – The content of this type of drop-in element is queried from a database. The database connection settings and the SQL statement are defined here. See the LISTSERV Maestro Administrators Guide, or the system administrator for more information.
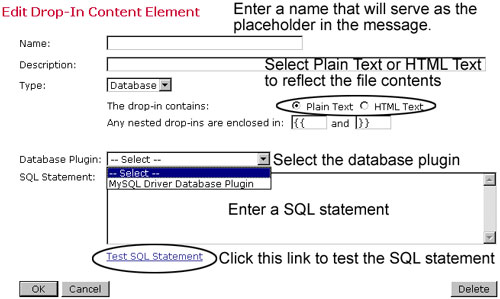
Click OK to save the new drop-in content element. Click Cancel to discard any changes and return to the "Manage Drop-In Content Elements" screen. Click Delete to delete the drop-in.