LISTSERV Tech Tip |
By Xinlu Shen
Software Support Engineer, L-Soft
LISTSERV 17.5 comes with support for SAML single sign-on through an extension to LISTSERV that needs to be installed separately. In this tech tip, we'll use Okta Developer Edition as an example to illustrate the procedure of adding Okta to the LISTSERV web interface as a SAML single sign-on provider.
What is Okta? Okta is a leading identity and access management service that provides secure single sign-on, multi-factor authentication and lifecycle management for organizations. It helps streamline user authentication and enhance security. For more detailed information, you can refer to Okta's official documentation on building a Single Sign-On (SSO) integration.
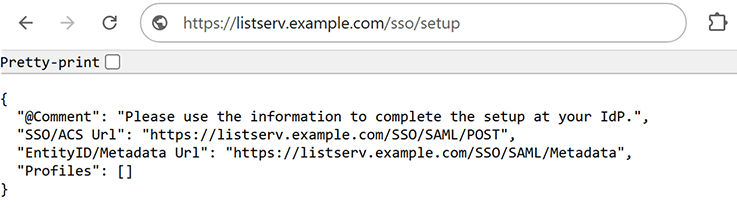
This tech tip assumes that you already have the LISTSERV SAML extension installed and properly initialized. When this is done, your samlsettings.json configuration file, which can be found in the SAML folder, should look something like this:
|
{ |
(On Linux, "WaUrl" usually ends with "cgi-bin/wa")
With a correct initial setup, the setup page should load with information in JSON format that identifies your site and can help with your IdP configuration. In the rest of this tech tip, we'll show how to create an application in Okta and integrate it with the LISTSERV SAML extension.
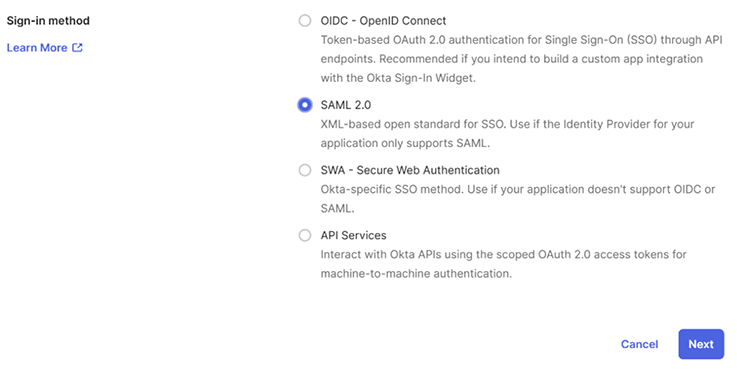
After logging in to your Okta admin portal, navigate to "Applications" > "Applications", where you can find all existing app integrations. Click on "Create App Integration", select "SAML 2.0", and proceed to the next step.

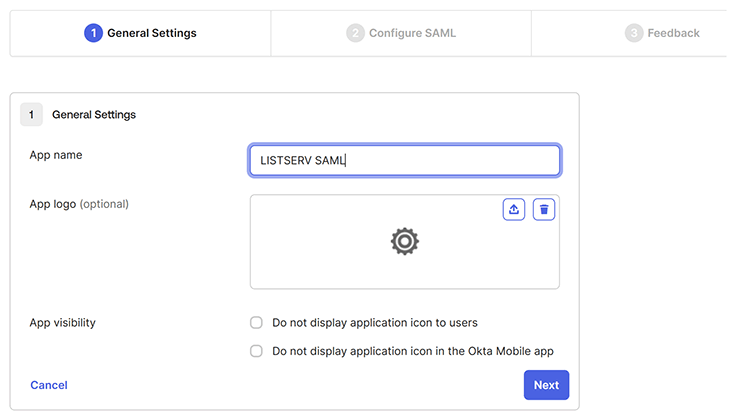
Give a name to the app integration (for example, "LISTSERV SAML") and, optionally, upload an icon to identify it.
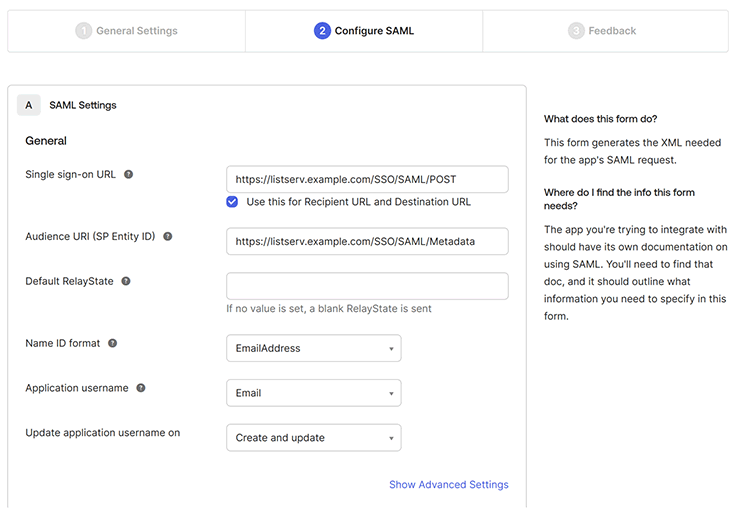
Click on the "Next" button to proceed to the "Configure SAML" screen. Use the information on the setup page to fill out this form. The nomenclature for the URL is slightly different. Here is some guidance:
Proceed to create the app integration, after which you should be able to see it under "Applications" > "Applications".

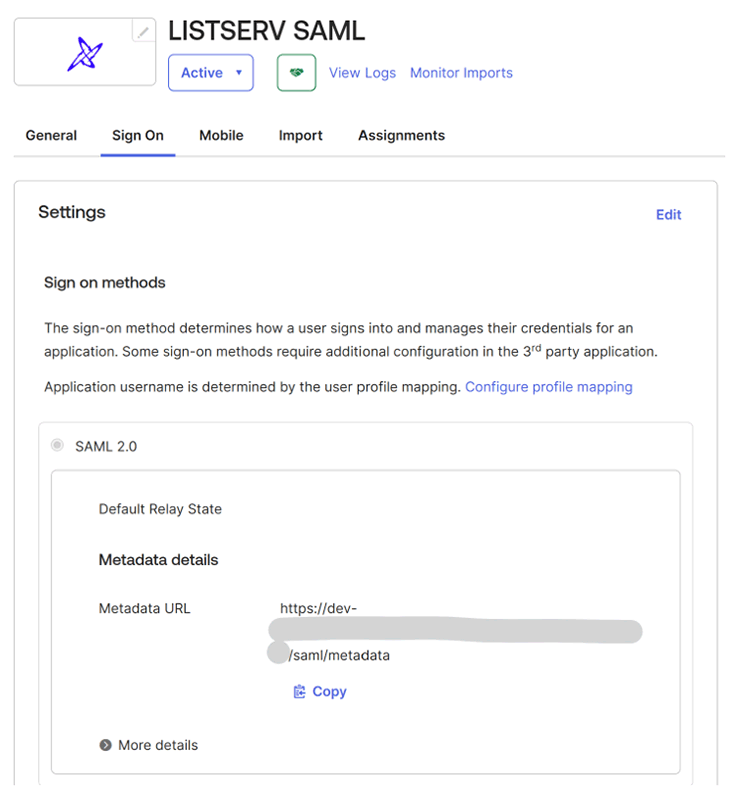
Click on the newly created app and navigate to "Sign On". Copy or take a note of the "Metadata URL" field.
Now that you have enough information from Okta, you can continue to configure the LISTSERV SAML extension. This is a two-step process and involves two JSON files: samlsettings.json and saml.merge.json.
Open the SAML configuration file named samlsettings.json. The initial content should have "IdpProfiles" as an empty list:
|
{ |
Add your IdP information into "IdpProfiles", for example:
|
{ |
Note that in order for the changes to "IdpProfiles" to take effect, you need to use saml.merge.json with your LISTSERV postmaster credentials.
This file is used for synchronization between settings in samlsettings.json and LISTSERV – for example, site variables and web templates. Such synchronization must be authorized by someone with LISTSERV postmaster access. Here is how:
1. Edit or create a file named saml.merge.json in the SAML folder, in the same location as samlsettings.json.
2. Copy the following information into the file, and use your postmaster credentials for the "Email" and "Password" fields.
|
{ |
Note that if you have previously done this step, you can change the value in "Action" to UPDATE to avoid initializing twice.
3. Restart the website under IIS or the SAML web application on Linux.
4. Go to the setup page again (for example, https://listserv.example.com/sso/setup) to make sure that the web application comes up without any errors. If it doesn't, check the logs at /logs/listserv-saml-yyyymmdd.log for details.
For security reasons, the saml.merge.json file will be automatically deleted after synchronization. If you would prefer to disable this auto-deletion, add this setting to samlsettings.json:
|
{ |
Note that any changes to samlsettings.json requires a website/webapp restart to be loaded.
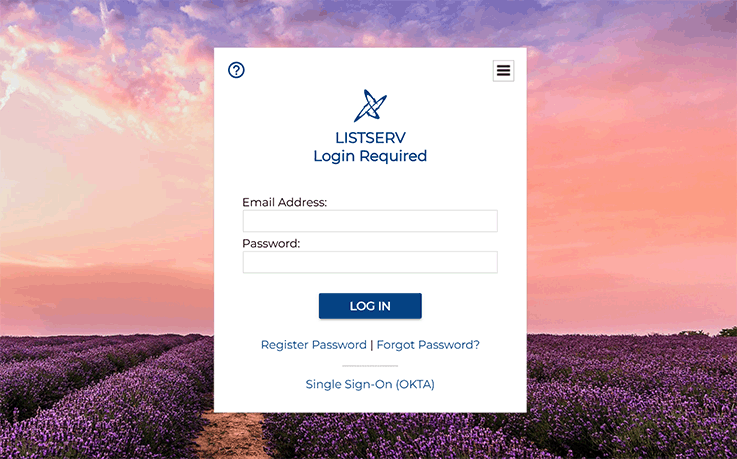
Now, let's do a final check on the setup page to see if the profile listed matches what your IdP provides. If everything looks good, you can visit the LISTSERV login page, where a new sign-in option, in this case "Single Sign-On (OKTA)", should show up below the usual email and password form. This is where users can log in to LISTSERV through Okta's SAML SSO mechanism that you have just configured.
We recommend disabling the setup page once in production by setting the EnableSetupPage property to false:
|
{ |
To enable Single Logout, you need to enable the SLO from both the SP and IdP ends.
1. Enable SLO in LISTSERV SAML by adding "SLO" to the IdP profile and setting it to true in samlsettings.json:
|
{ |
2. Go to the SAML Settings page in Okta and click on "Show Advanced Settings":
1. Check the "Allow application to initiate Single Logout" checkbox.
2. Enter the value of SingleLogoutUrl under the IdP profile from the setup page in the Single Logout URL field.
3. Enter the LISTSERV SAML metadata URL in the SP Issuer field.
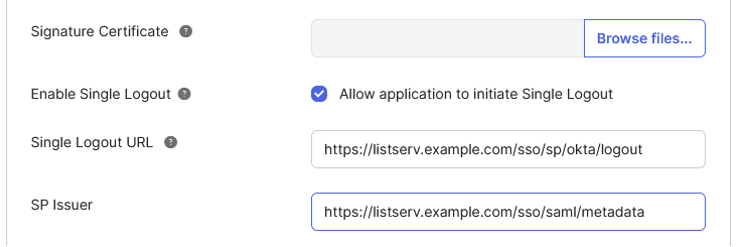
4. (Optional): If you wish to provide a signature certificate, you can visit the LISTSERV SAML metadata URL, copy the value from the "KeyDescriptor" > "KeyInfo" > "X509Data" > "X509Certificate" element into a text file and upload it to the Signature Certificate in Okta.
3. Restart LISTSERV SAML. You should see the following in the log file:
|
[XX:XX:XX INF] SLO for 'Okta' has been enabled. |
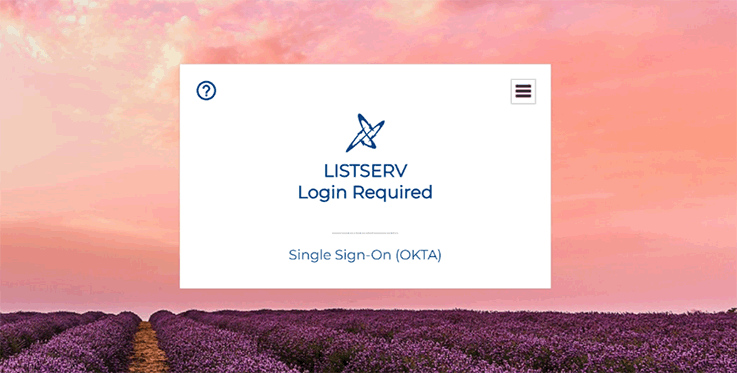
Once you have tested the single sign-on functionality, you may also want to hide the native login prompt altogether. This is how it can be done:
1. Add the following setting to samlsettings.json:
|
{ |
2. Create or edit saml.merge.json with an "UPDATE" action to push the change to LISTSERV.
|
{ |
3. Restart the website/webapp.
4. Refresh your LISTSERV login page. Single sign-on should now appear as the only login option available.
Was this article helpful to you? Would you recommend it to a colleague? Your input helps us create content that truly supports your work. Thank you!
|
Want More Insights? Catch up with the latest LISTSERV developments, industry best practices, expert tips, tutorials and more. |
LISTSERV is a registered trademark licensed to L-Soft international, Inc.
See Guidelines for Proper Usage of the LISTSERV Trademark for more details.
All other trademarks, both marked and unmarked, are the property of their respective owners.