Q: How can I create multiple email lists with a similar configuration and setup?
By Jacob Haller
Senior Support Engineer, L-Soft
Sometimes you may want to create a large number of lists, all with similar setups. Maybe each department in your organization needs its own discussion lists, or maybe you have found a particular type of setup that is useful in your organization for a variety of applications. In this tech tip, we'll explore a few different ways to create multiple similar lists.
Some of these methods will be most useful if you'll be creating the email lists over time, while others will be useful in situations where you need to create a large number of lists in a short period of time. Note, however, that with most of these approaches, the email list configurations will be duplicated but not any customized mail and web templates, archives or subscribers.
Cloning an Existing Email List
The method that requires the least preparation is to take an existing email list with a configuration that is more or less what you want and cloning it.
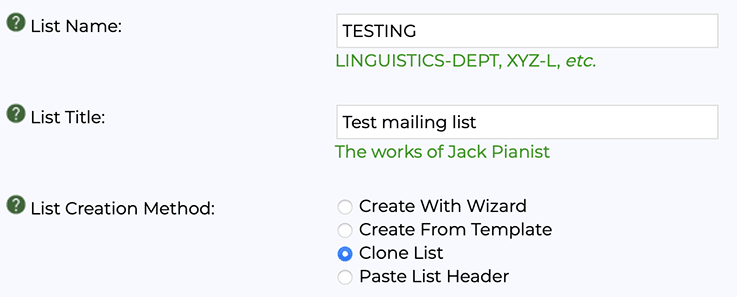
1. Go under "Server Administration" > "List Creation", fill in the new list name and title, choose "Clone List" from the List Creation Method and click the "Next" button.
2. Type in the name of the list that you want to clone.
3. Make any necessary changes to the new email list's configuration. If the list has archives, make sure to check and (if necessary) update the "Notebook" setting since the path used in this setting will often contain the list's name. Other settings that, if present, commonly need to be updated are the "List-Address" and "Subject-Tag" settings, but it's worth looking for the name of the mailing list being cloned, just to make sure.
As you can see from Step 3, this method means that you need to update a few settings on the new list, which can make it less efficient, so if you're going to be creating even just a handful of mailing lists at a time, then the following methods may be a better approach.
Customizing Your Library of List Configurations
You may have noticed that the "Server Administration" > "List Creation" page has a "Create From Template" option. This allows you to choose from a library of different templates, each of which contains a different group of settings when creating a mailing list.
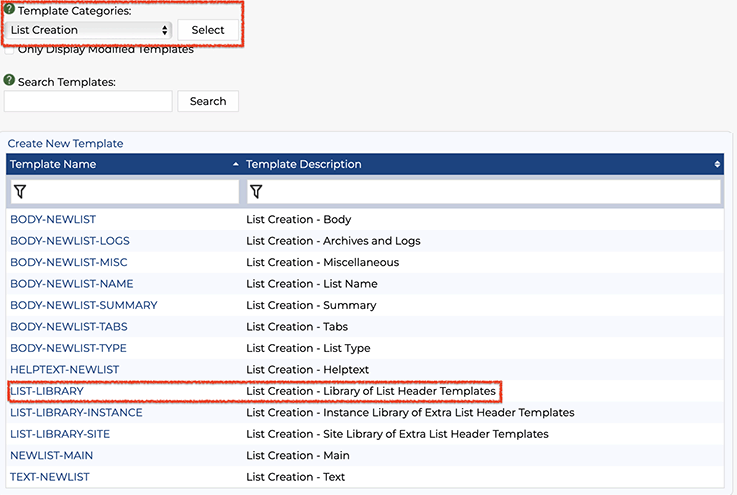
You can change this library of templates by adding new ones, removing ones that you don't find useful or changing settings that don't suit your needs in any of the existing templates. To do this, go under "Server Administration" > "Web Templates", choose "List Creation" from the "Template Categories" menu, and click on "Select". A list of different templates will then appear at the bottom of the page. The one you want to edit is the "LIST-LIBRARY" template.
Detailed instructions on how to use the template can be found at the top. However, here's a quick overview of how it works.
The lines starting with +IM at the very top are needed in order for the template to work and should be left alone. Below that, any lines starting with +* (a plus sign followed by an asterisk) are comments that LISTSERV won't do anything with. Those are strictly for your own use and edification, and you should feel free to add your own comments if you want to document what you're doing or clarify part of the instructions.
After that, you will find the list setup templates. Each template starts with a line that gives the name of the template and a short description of it. In the default version of the template, the first one is:
|
PUBLIC-DISCUSSION-1 Public Discussion List - Anyone Can Subscribe - Anyone Can Send (Including Non-Subscribers)
|
If you were creating discussion lists for different departments in your organization, you might make one like:
|
DEPARTMENT-DISCUSSION Department-specific discussion lists
|
This is followed by the list configuration. Each line of the configuration must start with an asterisk followed by a space. Beyond that, the standard rules for mailing lists apply.
For more information about the format of list headers, visit:
https://www.lsoft.com/manuals/17.5/listkwd/TheListHeader.html
The next line that doesn't start with a * (asterisk) marks the beginning of the next template, so you can include as many list templates as you want.
One advantage of using the list library to create mailing lists is that you can use variables to automatically insert, for example, the mailing list's name into the configuration, saving time and making errors less likely. For instance, when using the "Create From Template", there is a section where LISTSERV asks you if the mailing list should have archives.
The answers to these questions are assembled into a variable named &+NOTEBOOK;, allowing a list template to contain something like:
Similarly, &+OWNER; will insert any owners that have been specified earlier in the wizard, allowing you to use:
One variable whose usefulness might be overlooked is the &+ISODATE; variable, which inserts the current date. Since LISTSERV doesn't otherwise keep track of when a mailing list was originally set up, it can be useful to add a comment to the bottom of the template along these lines to automatically include a comment saying when the list was created:
Other variables are also available, such as the &+LISTNAME; variable, which inserts the name of the new mailing list – see the documentation at the top of the LIST-LIBRARY template for more information.
Please note that you are not required to use any of these variables. For instance, if the mailing lists created using your template should always have the exact same list of owners, you can just specify:
|
* Owner= chris@example.com,pat@example.com
|
In that case LISTSERV will not use the owners specified earlier in the wizard but will instead use the exact Owner setting given in the template.
Having a set of templates tuned to your specific needs can speed up list creation quite a bit, allowing you to create a mailing list with your desired settings. This makes them an invaluable tool, particularly if you are creating the mailing lists over time, as they are requested, rather than handling a large number of requests at once. If you find yourself in that latter situation, then the below approach may be a better fit.
Using a Script That Communicates with LISTSERV Directly
LISTSERV has a built-in API called TCPGUI, which can be used to send commands to LISTSERV interactively. This can, among other things, be used to create mailing lists. This is more complicated to set up than other methods, but once you've done the work of creating the script, it will allow a very flexible way for you to very quickly create a large number of mailing lists with a minimal level of human intervention required.
Probably the simplest way to issue commands using TCPGUI is via a program called lcmdx.
Windows users can download it from:
https://dropbox.lsoft.us/download/lcmdx-intel.zip
Unix users can find some C code for lcmdx in Section 10.5 of the Advanced Topics Manual. This code is provided "as is" and we can't provide help in compiling or modifying it.
Once you have lcmdx (or have created a script of your own that communicates with LISTSERV via TCPGUI), you can create a mailing list as follows:
1. Determine the configuration of the mailing list that you want to create. Let's say it's something like the following, with an asterisk followed by a space at the beginning of each line:
|
*
* This is a test mailing list
*
* .hh on
* Owner= chris@example.com,Quiet:,pat@example.com
* Subscription= By_Owner,Confirm
* Send= Private
*
* Notebook= No
* Change-Log= Yes
* Mail-Merge= Yes
*
* Created 2025-04-07 by ListCreateScript v.1.0
*
* .hh off
*
|
2. If you want LISTSERV to create the directory specified in the "Notebook=" setting, and/or you want it to create the directory necessary for LISTSERV to create a home page for the list, add the following lines to the beginning of the list configuration:
|
MAKE_NOTEBOOK
MAKE_WA
*
* This is a test mailing list
*
* .hh on
* Owner= chris@example.com,Quiet:,pat@example.com
* Subscription= By_Owner,Confirm
* Send= Private
*
* Notebook= No
* Change-Log= Yes
* Mail-Merge= Yes
*
* Created 2025-04-07 by ListCreateScript v.1.0
*
* .hh off
*
|
3. Since TCPGUI only accepts single-line commands, the above configuration has to be converted into a single-line format, as described in Section 10.4.1 of the LISTSERV Advanced Topics Manual. For each line, count the number of characters contained in that line (including the "* " (asterisk and space) at the beginning), and add that number followed by an underscore to the beginning of the line. Then, do the same for the following lines. For the above example configuration, the single-line version would be:
|
13_MAKE_NOTEBOOK7_MAKE_WA2_* 29_* This is a test mailing list2_* 8_* .hh on49_* Owner= chris@example.com,Quiet:,pat@example.com32_* Subscription= By_Owner,Confirm15_* Send= Private2_* 14_* Notebook= No17_* Change-Log= Yes17_* Mail-Merge= Yes2_* 46_* Created 2025-04-07 by ListCreateScript v.1.02_* 9_* .hh off1_*
|
4. Issue an "X-STL nameoflist" command, replacing "nameoflist" with the name of the mailing list that you want to create and following it with the single-line version of the mailing list's configuration. Using the name TESTING and the configuration given above, this would give:
|
X-STL TESTING 13_MAKE_NOTEBOOK7_MAKE_WA2_* 29_* This is a test mailing list2_* 8_* .hh on49_* Owner= chris@example.com,Quiet:,pat@example.com32_* Subscription= By_Owner,Confirm15_* Send= Private2_* 14_* Notebook= No17_* Change-Log= Yes17_* Mail-Merge= Yes2_* 46_* Created 2025-04-07 by ListCreateScript v.1.02_* 9_* .hh off1_*
|
If you want to make sure you've got the syntax right, you can try issuing the same command under "Server Administration" > "LISTSERV Command".
The exact syntax of the X-STL command can make it tricky to implement. If you are getting "Error in header data stream" errors, then that indicates that the command is not formatted quite correctly, usually because the number of characters specified for a particular line of the configuration isn't quite right. If that doesn't seem to be the problem, then you can try going to "Server Administration" > "Site Configuration" and setting DEBUG_LOG_TCPGUI to 1 under the "Debug" tab. Then, when LISTSERV prompts you to reload the LISTSERV configuration, click the button to do so. LISTSERV will now record the exact command in its log file, and you can compare that with what your script is sending.
The LISTSERV log file is located in the listserv\log\ directory under Windows. Under Unix, the file is by default named listserv.log and is located in ~listserv/home/. However, a different location may be specified in the LOG_PATH setting in the ~listserv/go.user file.
Next Steps
A Quick Favor – Your Feedback Matters
Was this article helpful to you? Would you recommend it to a colleague? Your input helps us create content that truly supports your work. Thank you!
Want More Insights?
Catch up with the latest LISTSERV developments, industry best practices, expert tips, tutorials and more.
|
LISTSERV is a registered trademark licensed to L-Soft international, Inc.
See Guidelines for Proper Usage of the LISTSERV Trademark for more details.
All other trademarks, both marked and unmarked, are the property of their respective owners.


