Email How-To Tip |
By Johannes Hubert
Senior Applications Programmer, L-Soft
There are many use cases where it's prudent to tailor the message content to the individual recipient so that different recipients see different message content. Typically, mail-merging has been the method of choice to achieve this. But what if you want to implement more large-scale tailoring than is possible with merging a different word or short phrase here and there? For example, what if you want whole sections of a message to either be included or excluded with much more content than can be provided by simple mail-merging?
This tech tip shows you how to easily achieve this using the fluid design widgets in LISTSERV Maestro, working directly in the design mode editor and without any manual HTML coding.
As an example, we'll use the "Golden Notes" newsletter, which is sent out regularly by a company named "Faberling & Sons", which is a publisher of high quality sheet music and music scores.
In each edition of the newsletter, in addition to some general articles and news, a number of new publications and revised music editions are promoted. These publications are of course released for different instruments – for example piano, violin or vocal music – and the different subscribers of the newsletter are usually interested only in a subset of these instrumentations.
To focus the subscriber's attention on those parts that are relevant for them and to keep the newsletter short and concise, the newsletter publisher wants each subscriber to only see the promotions that match their interests.
The first step to facilitate this is to collect this information as part of the subscriber profile so that the data is available in the form of a merge field with different values for different subscribers.
The method on how exactly this is achieved differs depending on the source of the subscriber list data as well as other requirements. For our example, we assume that the Golden Notes newsletter is a subscriber list in LISTSERV Maestro, and the information about the subscriber's interests is stored in a multiple-select profile field called "Instruments" that allows the subscriber to select one or more choices from a list of instruments.
No matter how exactly the information is stored, it must be available in the form of one or more merge fields, which we can then use to tailor the message based on the content of these merge fields. For example, the profile field from our subscriber list above is available as the merge field &INSTRUMENTS;.
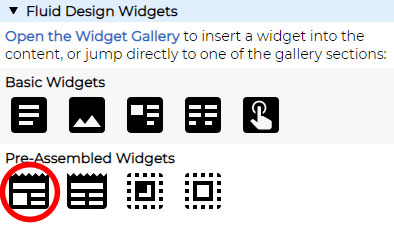
We now want to use this merge field to tailor our content, and to do so, we use the fluid design widgets in LISTSERV Maestro. Among the widgets available in the widget gallery of the editor, there are some ready-made widgets for newsletter articles under the "Pre-Assembled Widgets" heading, which are perfect for our purpose.
First you set the edit cursor to the position in the newsletter content where you want the article to appear. In our case, since we want to spruce up our article with a nice illustration, click on the icon for "Illustrated Articles".
Then select the article variant that you want to use:
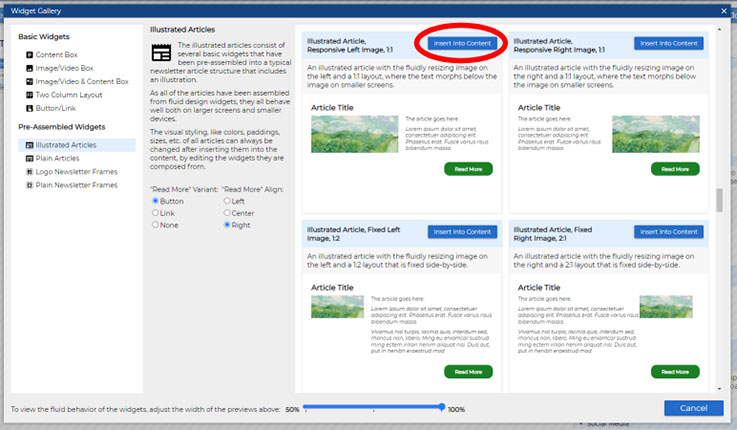
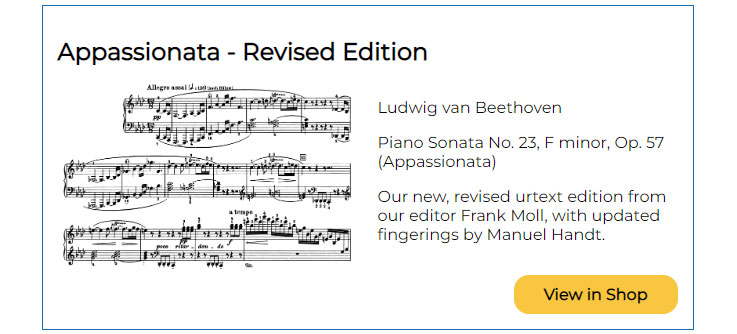
In this example, we decided to go with an article that has the illustration image and article text side-by-side, with a button below. We fill out this space with the desired text and image for our new edition of Ludwig van Beethoven's famous "Appassionata" piano sonata. Then we edit the button to create a "View in Shop" link to the purchase page of this new edition.
Now to the most important part. As we want this article to only appear in the newsletter if the recipient has expressed interest in piano music, we now add a widget condition to this article. With such a condition defined, the widget, and therefore the article, only appears in the recipient's version of the newsletter if the condition evaluates to "true" for that recipient.
To define such a condition, first open the widget properties dialog for the article widget by selecting the widget in the editor and clicking on the "Widget Options" icon in the top-left corner of the widget frame to open the options menu:
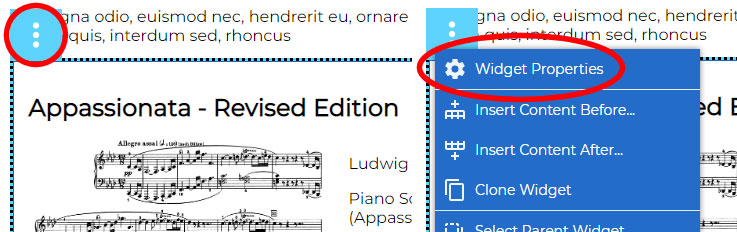
In the "Widget Properties" dialog, select the "Condition" tab. On this tab, check the "Conditionally show or hide the widget" checkbox and then enter the desired condition into the condition input field:
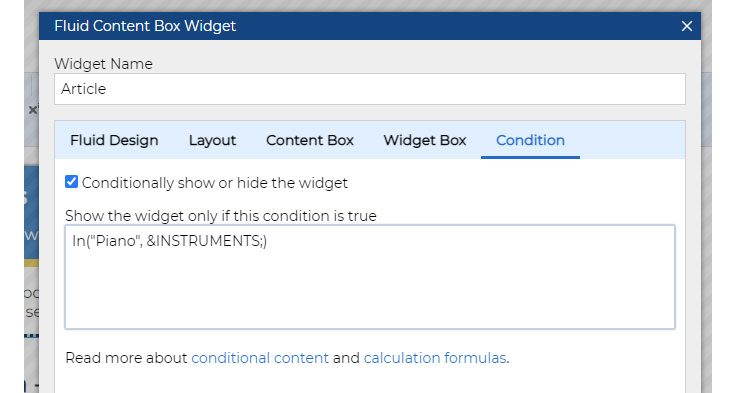
In our case, we'll enter the condition In("Piano", &INSTRUMENTS;) to check if "Piano" is among the selections that the subscriber made for the "Instruments" profile field. Of course, if your profile fields are defined differently, you need to adjust the condition accordingly. The syntax for these conditions is the same as the syntax for calculation formulas (for example, when using the *Calc system drop-in). Essentially, you need to enter a calculation formula that gives you a "true" or "false" result. You can find more information about calculation formulas at:
https://maestro.lsoft.com/help/formulas/formulas.jsp
You can now include additional articles in the same fashion with different conditions for different instrumentations, like In("Violin", &INSTRUMENTS;) or In("Choir", &INSTRUMENTS;), depending on what other new releases you want to promote in this newsletter.
A widget condition can be added to any widget in your content, not only to article widgets as shown in the example above. If you have several nested widgets, make sure that you add the condition to the desired widget. If you want the whole nested structure to be included or excluded, then you need to add the condition to the outermost widget of the structure. But if only a specific nested widget should be included or excluded, then you need to add the condition to that specific widget.
For example, adding a condition to an image box widget allows you to easily include a specific image based on a condition. Let's say that you divide your subscribers into different tiers based on the number of purchases that they have made in the past year. You can then simply add a condition to the image box widget to insert the corresponding icon for each recipient.

Was this article helpful to you? Would you recommend it to a colleague? Your input helps us create content that truly supports your work. Thank you!
|
Want More Insights? Catch up with the latest LISTSERV developments, industry best practices, expert tips, tutorials and more. |
LISTSERV is a registered trademark licensed to L-Soft international, Inc.
See Guidelines for Proper Usage of the LISTSERV Trademark for more details.
All other trademarks, both marked and unmarked, are the property of their respective owners.